Discover Eye Makeup Step by Step: The Complete Guide to Flawless Eye Makeup for Beginners and Beauty Lovers
Eye makeup has the power to transform your entire appearance. Whether you want a fresh everyday look, a sophisticated office style, a glamorous evening makeup, or a dramatic smoky eye, mastering Eye Makeup Step by Step is the key to achieving beautiful and professional-looking results.
Many people believe that flawless eye makeup requires advanced skills or expensive products. In reality, the secret lies in understanding eye structure, using the right techniques, and applying products in the correct order. Once you learn the fundamentals of Eye Makeup Step by Step, creating stunning eye looks becomes easier and more enjoyable.
This comprehensive guide covers everything you need to know, from understanding eye anatomy and selecting the right tools to applying eyeshadow like a professional makeup artist. By the end of this article, you’ll have the confidence to create eye makeup looks that enhance your natural beauty and last all day.
Table of Contents
- Understanding Eye Makeup Anatomy
- Essential Tools for Eye Makeup
- Why Eye Makeup Step by Step Matters
- The Complete Eye Makeup Step by Step Tutorial
- Best Eyeshadow Colors for Every Eye Color
- Eye Makeup Step by Step for Different Eye Shapes
- Natural Eye Makeup Step by Step
- Smokey Eye Makeup Step by Step
- Common Eye Makeup Mistakes to Avoid
- How to Make Eye Makeup Last All Day
- Frequently Asked Questions
- Conclusion
Understanding Eye Makeup Anatomy
Before learning Eye Makeup Step by Step, it is important to understand the different areas of the eye and how they contribute to the final makeup look.
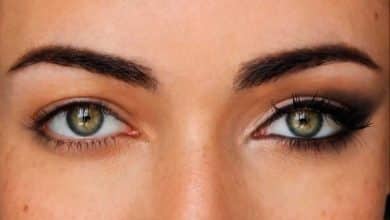
The Lid
The lid, also known as the mobile eyelid, is the main area where your featured eyeshadow color is applied. Light, metallic, matte, or shimmering shades are typically placed here to create the focal point of the eye makeup.
The Outer V
The Outer V refers to the outer corner of the eye. Darker shades are placed here to intensify the look and create a lifted effect.
The Brow Bone
Located directly beneath the eyebrow, the brow bone is ideal for applying a subtle highlight that creates a polished and lifted appearance.
The Inner Corner
The inner corner is one of the most important highlighting points. A touch of luminous eyeshadow in this area instantly brightens the eyes and creates a fresh, awake appearance.
Understanding these zones is the foundation of successful Eye Makeup Step by Step application.
Essential Tools for Eye Makeup
Before starting your Eye Makeup Step by Step routine, make sure you have the right tools.
Eyeshadow Primer
A quality primer creates a smooth base, prevents creasing, and helps eyeshadow last longer.
Fluffy Blending Brush
This brush is used to blend transition shades and soften harsh lines.
Flat Eyeshadow Brush
Ideal for packing color onto the eyelid.
Pencil Brush
Perfect for applying highlights to the inner corner and brow bone.
Eyeliner
Available in pencil, gel, liquid, or powder form, eyeliner helps define the eyes.
Eyelash Curler
A simple tool that instantly opens the eyes and enhances mascara results.
Mascara
The final touch that adds volume, length, and definition to the lashes.
Why Eye Makeup Step by Step Matters
Professional makeup artists follow a specific sequence because it creates the most balanced and polished results.
Building colors gradually from light to dark allows each shade to blend smoothly while preventing muddy or uneven eyeshadow. Following an Eye Makeup Step by Step method also improves makeup longevity and creates a more flattering shape.
Whether you’re creating a natural look or a dramatic evening style, this structured approach delivers consistently beautiful results.
The Complete Eye Makeup Step by Step Tutorial
Prepare the Eyelids
Every successful Eye Makeup Step by Step routine begins with proper preparation.
Apply a thin layer of eyeshadow primer or lightweight concealer from the lash line to the brow bone. Lightly set the area with translucent powder.
This step prevents creasing, neutralizes discoloration, and creates the perfect canvas for eyeshadow application.
Apply a Transition Shade
Using a fluffy blending brush, sweep a neutral shade slightly darker than your skin tone into the crease and slightly above it.
Use gentle windshield-wiper motions to create a soft gradient.
The transition shade acts as a bridge between lighter and darker colors, ensuring seamless blending.
Define the Crease and Outer V
Using a denser blending brush, apply a medium-to-dark eyeshadow to the outer corner of the eye.
Blend the color softly into the crease while keeping the deepest intensity concentrated on the Outer V.
This technique creates depth, dimension, and a naturally lifted appearance.
Apply the Main Lid Shade
Using a flat brush or your fingertip, press your chosen eyeshadow onto the eyelid.
For maximum color payoff, avoid sweeping motions and gently press the product into place.
Popular choices include:
- Champagne
- Gold
- Bronze
- Rose Gold
- Pearl
Highlight the Inner Corner and Brow Bone
Apply a luminous highlight shade to the inner corner and directly beneath the brow arch.
This instantly brightens the eyes and creates a youthful, refreshed appearance.
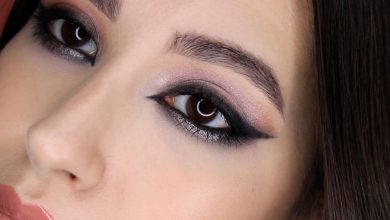
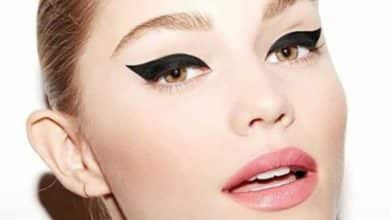
Define the Lash Line
Apply eyeliner along the upper lash line.
For a softer finish, use dark brown or black eyeshadow and smudge it gently along the lashes.
Apply a small amount of your transition shade or darker eyeshadow along the lower lash line for balance.
Finish with Mascara
Curl your lashes for five to ten seconds before applying mascara.
Apply one or two coats using a zigzag motion from root to tip.
Mascara completes the Eye Makeup Step by Step process by adding volume, length, and definition.
Best Eyeshadow Colors for Every Eye Color
Brown Eyes
- Gold
- Bronze
- Copper
- Plum
- Emerald Green
Blue Eyes
- Warm Brown
- Bronze
- Peach
- Copper
- Terracotta
Green Eyes
- Purple
- Mauve
- Burgundy
- Plum
- Rose Gold
Hazel Eyes
- Olive Green
- Gold
- Bronze
- Copper
- Deep Brown
Eye Makeup Step by Step for Different Eye Shapes
Hooded Eyes
For hooded eyes, apply transition and crease shades slightly above the natural crease while keeping the eyes open.
Downturned Eyes
Always blend eyeshadow and eyeliner upward toward the tail of the eyebrow.
Monolid Eyes
Focus on creating a vertical gradient by placing darker shades near the lashes and blending upward into lighter shades.
Round Eyes
Extend darker shadows slightly outward to create a more elongated appearance.
Almond Eyes
Most eyeshadow techniques work beautifully on almond-shaped eyes.
Natural Eye Makeup Step by Step
Natural makeup remains one of the most searched beauty trends worldwide.
To create a simple everyday look:
- Apply a soft beige transition shade.
- Use light brown in the crease.
- Apply champagne eyeshadow on the lid.
- Add brown eyeliner.
- Finish with mascara.
This Eye Makeup Step by Step look is perfect for work, school, and everyday wear.
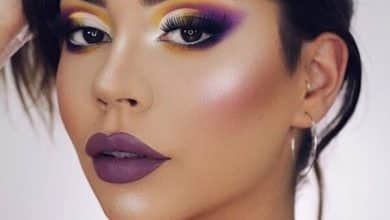
Smokey Eye Makeup Step by Step
The smoky eye remains a timeless classic.
To create a smokey eye:
- Apply primer.
- Use a medium brown transition shade.
- Deepen the Outer V with dark brown or black eyeshadow.
- Apply a metallic bronze or dark shimmer shade to the lid.
- Smudge dark eyeshadow along the lower lash line.
- Add black eyeliner.
- Finish with volumizing mascara.
The key to a beautiful smoky eye is blending. Every edge should appear soft and seamless.
Common Eye Makeup Mistakes to Avoid
Skipping Primer
Without primer, eyeshadow may crease and fade quickly.
Applying Too Much Product
Adding excessive eyeshadow at once makes blending difficult.
Ignoring Transition Shades
Transition shades create the smooth gradients that make eye makeup look professional.
Using Dirty Brushes
Dirty brushes can cause muddy colors and uneven application.
Overloading the Lower Lash Line
Too much darkness under the eyes can make them appear smaller and tired.
Not Considering Eye Shape
Customizing Eye Makeup Step by Step techniques to your eye shape can dramatically improve results.
How to Make Eye Makeup Last All Day
- Always use an eyeshadow primer.
- Apply thin layers of product.
- Build color gradually.
- Use waterproof mascara.
- Set your makeup with setting spray.
- Avoid touching your eyes throughout the day.
- Use high-quality brushes for smoother application.
Frequently Asked Questions
What is the correct order for Eye Makeup Step by Step?
The correct order is primer, transition shade, crease color, lid shade, highlight, eyeliner, and mascara.
Can beginners learn Eye Makeup Step by Step easily?
Yes. Starting with neutral shades and practicing blending techniques makes the learning process much easier.
Why does my eyeshadow crease?
Creasing usually occurs when primer is skipped or when the eyelids are naturally oily.
Which eyeshadow colors are best for beginners?
Neutral shades such as beige, taupe, soft brown, champagne, and bronze are ideal for beginners.
Should I apply eyeliner before or after eyeshadow?
Most makeup artists recommend applying eyeliner after eyeshadow for a cleaner finish.
How can I make my eyes look bigger?
Use lighter shades on the lid, highlight the inner corner, curl your lashes, and apply mascara.
What is the purpose of a transition shade?
A transition shade helps blend colors smoothly and prevents harsh lines.
Can I use concealer instead of primer?
Yes. A lightweight concealer can work as an alternative base.
How many eyeshadow shades should beginners use?
Two to three shades are often enough to create a beautiful and balanced look.
What is the biggest eye makeup mistake?
The most common mistake is insufficient blending, which can make eyeshadow appear harsh and uneven.
Conclusion
Mastering Eye Makeup Step by Step is one of the most valuable beauty skills anyone can learn. Understanding the anatomy of the eye, using the right tools, and following a structured application process allows you to create eye makeup looks that are elegant, balanced, and long-lasting.
Whether you prefer a soft natural look, a sophisticated everyday style, or a glamorous smoky eye, the principles of Eye Makeup Step by Step remain the same. Build colors gradually, blend carefully, highlight strategically, and adapt techniques to your unique eye shape.
With consistent practice and the right techniques, achieving professional-looking eye makeup becomes easier with every application. The more you refine your Eye Makeup Step by Step routine, the more confident and creative you’ll become in expressing your personal beauty style.